Hosting a super fast, modern, yet super-simple blog on Azure for 2$ a month? In this post, I explain, step by step, how I run this blog “serverless” and how my architecture evolved and simplified over time. Never had so much fun to blog.
Hugo - a primer
Hugo is a static website generator that I chose because of its simplicity and performance. You write a few lines of Markdown in VSCode, Hugo compiles them literally in milliseconds to HTML. You put the HTML on a web server and you are done. No additional moving parts like databases and pretty small attack surface because everything is static (looking at you, Wordpress plugins!). No parts that I have to patch! Simplicity wins.

From the publishing side, with Hugo, you get a modern content management system with a great community and awesome features. And because you just write markdown files, you can choose every editor that you want to use. And you can compose them without internet connectivity. You can tell, I am a big fan!
My publishing workflow: I create my posts in VSCode - the experience for writing this post looks like this:

With the local web server that comes with Hugo, I get an instant preview:

Building my entire blog with 1087 pages and a lot of other stuff took 6 seconds:

Great, right?
At first, I was worried about Markdown - but with the live preview and a markdown cheat sheet it is a what you see is what you get (WYSISWG) experience that just works everywhere. Because I can edit my posts in Azure DevOps in a browser, I am not even dependant on a local environment. That comes handy if you quickly want to fix a typo or a quick update. And with git as a backend, I can commit tiny changes, continue later, switch PCs - as simple as writing code ;)
Lastly, I use tinypng.com/ to compress my images. And the ‘Check my links’ Chrome extension to quickly check that all links are correct.
Evolving Architecture - things get faster, better, cheaper
When I migrated of Wordpress to Hugo, I hosted this blog on Azure App Service. This was great to get going, and by then there was no alternative to me. Once the Azure Storage Static Website feature was available, I immediately made the switch to it. Having simple storage that can be exposed to the web is a quick win for static websites and a no-brainer from a cost perspective. So I migrated to that and switched to Azure DevOps for updating my blog in a CI/CD manner. Cutting the cost from 70$ to approx 2$ per month is awesome.

The old architecture was not overly complicated - but doing a build with a .deployment file pointing to a .bat file felt awkward. My source code was in bitbucket and a push to it triggered a deployment. Okayish, but too expensive for my tiny blog because of the fully fledged App Service.
How to build it
So if you want to have a neat little website or blog for small money, I am going to give you a step by step instruction how to get up and running. Bare with me, it is a rather long post.
As a prerequisite you need the following:
Prerequisites
- a free Azure Account. You can try for free for 12 months and get 5GB of storage to host your website.
- a free Azure DevOps Account. It’s free for up to 5 users and you get 1800 build minutes to update your blog. If you open source your code, then you get unlimited build minutes!
- VSCode (free) - or a similar and awesome code editor.
Prerequisites for initial setup
I use the awesome ‘yo team’ generator by Donovan Brown to set up and configure Azure DevOps. This is not the only way to create an Azure DevOps project, but for me it automates the following:
- It creates an Azure DevOps project
- It creates a Service Endpoint so Azure DevOps is allowed to create resources on Azure.
- It creates a new git project locally and connects it with the Azure DevOps git repository.
A prerequisite for ‘yo team’ is an installation of Node.js (install the LTS version!). Once you have it installed, you can install yeoman and the generator with
npm install -g yo generator-teamNow let’s get started:
Step 1: Setting up Azure DevOps
As mentioned earlier, with ‘yo team’ installed you can script the basic setup of Azure DevOps, the build pipeline and the connection to Azure. To make it work you need a Personal Access Token (PAT) to authenticate against Azure DevOps. You can create a PAT via the following link:
https://dev.azure.com/[ORGANIZATION]/_usersSettings/tokens
You have to replace [ORGANIZATION] with your organization, of course.
Then click on “New Token” on the left and create a token with full access scope that is valid for 30 days. We do this only once, so it is not required to have a token that lives longer.

After saving the form, you get the PAT. Please copy it to a safe place so that we can use it later. Once you leave the page, you can’t see it again and would have to create a new one.
Next up, copy the script below and replace the 3 placeholders:
- $projectName with the name of your new project
- $organizationName with the name of your Azure DevOps organization.
- $azureDevOpsPersonalAccessToken with the PAT you generated before.
Then execute the following command to create the project:
yo team:project --applicationName $projectName --tfs $organizationName --pat $azureDevOpsPersonalAccessToken
Afterward, you have a new, empty project in Azure DevOps:

Next up, we need to connect Azure DevOps with Azure so that we can create resources on Azure and finally store the HTML files. Therefore I use the yo team wizard to create the connection by using the command:
yo team:azureThe required values and the Azure connection is then prompted:

After successfully providing all values, you have a new service connection in Azure DevOps:

Next, we create a local git repository and connect it to Azure DevOps. Open a PowerShell prompt and navigate to a folder where the git repository should be stored and then execute:
yo team:gitAgain, provide the prompted values:

Afterward, download the following yaml build file and open it with a text editor.
In line 17 you have to specify the Azure subscription name. When in doubt, get it here. In line 20 you can specify the resource group name. In line 21 you must specify the storage account name. This name must be unique, otherwise, the creation will fail. In line 22 you can specify the storage location. In line 33 you have to specify the Azure subscription name, same as line 17. In line 35 you have to add the same storage account name from line 21.
Once you commit this file and push it to Azure DevOps, a build is triggered. It will create a storage account for you with the static website feature enabled.
The foundation is done, now let’s configure Hugo.
Step 2: Setting up Hugo
The steps to create a new Hugo site are pretty easy. Firstly you need the Hugo executable. Most conveniently you get it via chocolatey by using
choco install -y hugoOnce you have that, open a PowerShell prompt and navigate to the git folder we created above. The use
hugo new site --force .Hugo comes by default without a theme, so you have to get one from the theme catalog. I started with the theme “Ananke” and cloned it into the themes subfolder.
git submodule add https://github.com/budparr/gohugo-theme-ananke.git themes/gohugo-theme-anankeTo start with an example site, use the following commands:
#copy the example site to the parent folder
Copy-Item -Recurse -Force .\themes\gohugo-theme-ananke\exampleSite\* .
#adjust the theme configuration
(Get-Content config.toml) -replace 'themesDir = "../.."' | Set-Content config.toml
The rest of the theme options are explained in the theme repository - you can configure a lot of stuff. If you want to use my theme, I adjusted ‘[hugo-future-imperfect]’(https://github.com/jpescador/hugo-future-imperfect) to my needs.
To see the website locally, start Hugo in server mode:
hugo serverThen your website will be available at http://localhost:1313 and should look like this:

Step 3: Publish
Great, you read so far! You are just a push away to have the website running on Azure:
git add .
git commit -m "first push"
git push
Then switch to Azure DevOps to see the build output
https://dev.azure.com/[organization]/[project]/_build/ (replace the placeholder)

Once that successfully ran, the new website is available at:
https://mamelch12345.z6.web.core.windows.net/ - your URL is of course different.
You can get your URL either in the Azure Portal or you can click on the Azure DevOps build on the Task “Azure CLI”. It is shown in the ‘primaryEndpoint’ block:

Your domain
Lastly, you should, of course, point your domain to the storage account. This can be done in the Azure portal (no automation AFAIK), documentation is available here. Unfortunately, with this approach, you do not get an SSL certificate for your domain and you cannot add it right away, yet. To add a certificate and a custom domain, you should follow this guide, to put Azure CDN in front of the Azure Storage. My domain is currently managed by Cloudflare, I added their cloud proxy in front of the Azure CDN - that further reduces my cost.
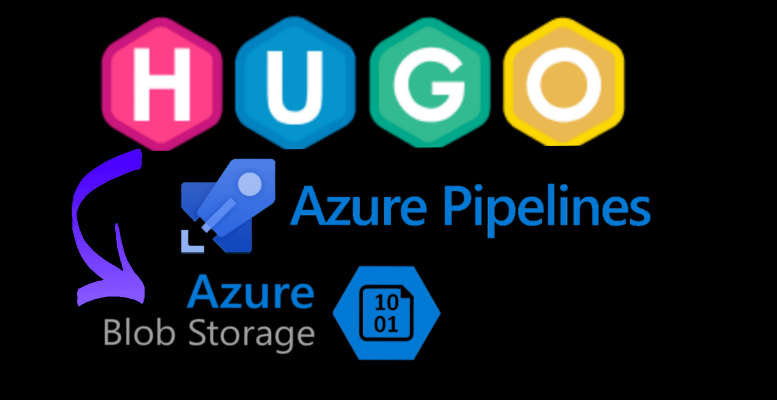
Current Architecture
To sum it up: In my current architecture, I use Azure DevOps to store my source code (free), using the build minutes (free) to put the resulting HTML files on Azure Storage (almost free). Then I use Azure CDN to speed up the delivery worldwide (almost free). Additionally, I index my blog with Azure Search (free) to have a top-notch search function.

More Hugo
In this post, I could only scratch the surface of what Hugo is capable of, so I really suggest you dive into the great documentation to learn more.
Costs
Ok, let’s have a look at the cost:

So 5.63€ for March 2019? You said 2$ a month!!! Well, yes, on average it is that. But in March I experimented a lot and that resulted in several wipes of the entire Azure Storage. Additionally, I had GRS (geo-redundant storage) enabled on this storage account for reasons that are no longer available to me. The normal month is usually 2$ for me. All transaction- or transfer-related costs should be pretty much covered by the Cloudflare CDN proxy in front of the Azure CDN, so even huge spikes do not cost me anything. Awesome.
For completeness, here is the calculation.
0.92$ - still not 2$. Yepp, I automated the post to Twitter and LinkedIn with a LogicApp and that one cost 1.11$ per month. And it checked my blog every minute for new posts by polling the RSS feed, reduced it to 60 minutes to save some pennies.
Performance
Comparing website performance is a tough and complex matter. As mentioned above, every request is cached with the excellent Cloudflare proxy. Static HTML files are perfect for caching and there is no other IO dependency (e.g. database connect) for my blog:

So the response times around the globe are super low. Other performance optimizations like javascript & CSS bundling are provided by Hugo - but it really depends on the theme and how it is implemented. And on the images that you put on your pages… Am I happy with the perceived performance? For 2$ a month and the little time I put into optimizing my blog: I am super happy.
Chrome most of the time loads in less than a second:

Google Analytics claims that the average load time is: 2.91s

But in general, I am totally fine with the performance - how fast did the page load for you?!
Security
Security and Static Websites are a great start for decent security. No SQL injections, no connection strings, no web servers that you have to patch, no PHP - nothing. And a free SSL certificate secures all traffic (Cloudflare makes that one very easy!) - good, right? Additionally, I configured HTTP Strict Transport Security (HSTS), so accessing this blog without SSL is prohibited. The only thing that I need to protect is the access to the Azure storage account and my CDNs. 2-Factor and passwords even I do not know should be ok.
On the other hand, additional headers, like Referrer-Policy or X-Frame-Options, Content-Security-Policy cannot be set.
And then there are some parts that are a little out of my hands. Like the DISQUS comment integration. If they screw up, it will affect my blog. But I am pretty sure they have decent security measures, so I accept that risk.
Tiny things I love about Hugo
Additionally, here are a few points that might come unnoticed if you briefly look at Hugo, but are great if you need them:
Simple template language
As mentioned before, I started with the awesome ‘hugo-future-imperfect’ theme. It’s well written and the critical parts are documented. With that, it was rather easy for me to do tiny adjustments:
- Adding the free Azure Search as ‘search as you type’ addon.
- changing the ‘scroll-to-top’ function in the bottom right (turn sound on).
- Modernizing the javascript frameworks
- Adding placeholders here and there that are managed centrally.
- Showing the recent 3 posts in the sidebar, but not the one that is shown on the right.
- Putting the Xing social icon in the top
- Tweaked the header on the left
- Added yearly/monthly archives, e.g. all posts for 2019 or March 2019
Plain markdown files
After migrating of Wordpress, I had lots of issues keeping my URL schema or my short URLs up and running. But I used a few lines of PowerShell to update the page metadata. I had to do this multiple times because of some edge cases, but with the power of git, a revert was super fast and effective. I really like the Front Matter, the metadata describing a post, in the readable form attached to a post. It makes just sense.

Drafts in the open / Short URLs
Usually, a draft is not visible to anyone and of course, that is okay. But sometimes you want to share a draft with someone for a review or help. So on Wordpress, I, therefore, installed a plugin, that made private sharing possible by adding a token to the URL so that only people with that link could access the draft. And I thought I want to have that for Hugo, too. Luckily with the flexible template language of Hugo, that is very easy to do. Create a new folder in the content section and then hide it from the places where Hugo iterates all posts (for me that is index.HTML, home.json, rss.xml, sitemap.xml - but depends on your theme!). The iteration then looks like this:
|
|
I line 1 you can see that I do a where clause on all Pages that are not in the Section “s” nor in “draft”. In other words I hide my shorturls and my drafts.
If you then add an Alias to the Front Matter, then the URL is still available after regular publishing.
The same approach can be used for short-URLs, too.
Summary
I guess that is the longest and detailed post I ever wrote: I hope you came so far and learned a bit here and there - if so, make my day and leave a comment! If things in the step-by-step guide did not work out for you, leave a comment. If you have other thoughts an concerns about the costs, security - leave a comment :)
Hope it helps,
Max

Share this post
Twitter
Facebook
LinkedIn
Email